The M2E Multichannel Connect plugin for WooCommerce allows you to connect your store to Amazon, eBay, Walmart, TikTok Shop, Kaufland, and Temu marketplaces. Operate your sales data from all Channels within your WooCommerce admin interface.
ℹ️ M2E Multichannel Connect is compatible with WooCommerce starting from version 6.x.x and WordPress from version 6.1.x.
💡 Watch an overview of the M2E Multichannel Connect plugin on YouTube.
Installation #
You have two installation options:
Option 1. Install from a ZIP file
- Download the plugin's ZIP file from our GitHub repository to your device.
- In WordPress Admin, go to Plugins > Add New > Upload Plugin > Choose File.
- Click Install Now and then Activate Plugin.
- Follow the setup wizard in your WooCommerce site.
Option 2. Install via WooCommerce Marketplace
ℹ️ Important: You must have an account on WooCommerce.com. If you do not have an account, you will need to create one before proceeding.
- Navigate to M2E Multichannel Connect page on the WooCommerce marketplace.
- Follow the on-screen instructions to complete the installation.
✅ If you have issues during the initial setup of the M2E Multichannel Connect plugin for WooCommerce, please check out this guide.
Setup and Configuration #
After activating the plugin, you'll be prompted to grant access to your WooCommerce account. Click the Accept button in the pop-up window to proceed.
Then, you will need to connect your Channel accounts (Amazon, eBay, Walmart, TikTok Shop, Kaufland, or Temu) by following the provided instructions. Adding accounts doesn’t enable item synchronization. You can get acquainted with the plugin first and turn on the inventory sync manually later.

Once the accounts are linked, you’ll be taken directly to the M2E Multichannel Connect setup guide.
- Link existing Channel items to your WooCommerce products automatically based on SKU or Product ID manually or automatically.
- Enable synchronization for existing Channel items linked with products from your WooCommerce catalog.
- Define order management settings and enable the 'Create Orders in WooCommerce' option to allow the app to create orders in your Woo system whenever a customer places an order on a marketplace.
- Create new listings on Channels based on your WooCommerce inventory.
That’s it! Now, you can use the M2E Multichannel Connect plugin to handle and list your WooCommerce inventory, manage and fulfill Channel orders, and more.
💡 Check out step-by-step guides on importing eBay and Amazon products to WooCommerce.
Link Channel items #
M2E Multichannel Connect matches items from your connected channel and WooCommerce catalog by SKU or Product ID and links them automatically. If no match is found, you can link the items manually. For that, follow the instructions below.
For products already in your store and marketplace:
- Navigate to the Listings tab and choose your Channel account from the drop-down menu. There, you'll find the list of items imported from the Channel.

2. Use the filters to find products that are not linked.

3. Click the Link button and search for the matching product by title, SKU, or identifier.

4. Choose Link & Sync to enable inventory sync immediately, or Just Link the item if sync isn’t needed right away.

If there is no matching product in WooCommerce for your Channel listing:
Click the Link button, then select Create in WooCommerce and link in the pop-up. A new item will be automatically created in your Woo store and linked to your marketplace listing.

💡 For detailed instructions on linking products in bulk, see here.
Once your items are linked, it’s time to enable their synchronization to ensure automatic product data updates on Channels.
Enable synchronization for Channel items #
To ensure that your inventory remains up-to-date on Channels, you need to enable its synchronization. Item sync provides automatic product data updates on Amazon, eBay, Walmart, TikTok Shop, Kaufland, and Temu.
Follow the instructions below to enable inventory sync for your Channel items.
- Navigate to the Listings tab and choose your Channel account from the drop-down menu. Ensure that your Channel item is linked to a WooCommerce product before enabling sync.
2. Use filters to find products that are already linked but not yet synchronized.

You can enable sync for items either individually or in bulk.
- To enable sync for an individual item, click on the toggle in the “Inventory sync” column next to the item. You’ll see a relevant message if the synchronization is enabled.

- To enable sync for items in bulk, select the needed items by ticking the boxes on the left side of the grid. Then, submit the “Enable Sync” action from the top menu.

4. Check the default policies of your product, or choose to edit them according to your needs. Selling and Synchronization Policies are required, so make sure to set them up thoroughly.
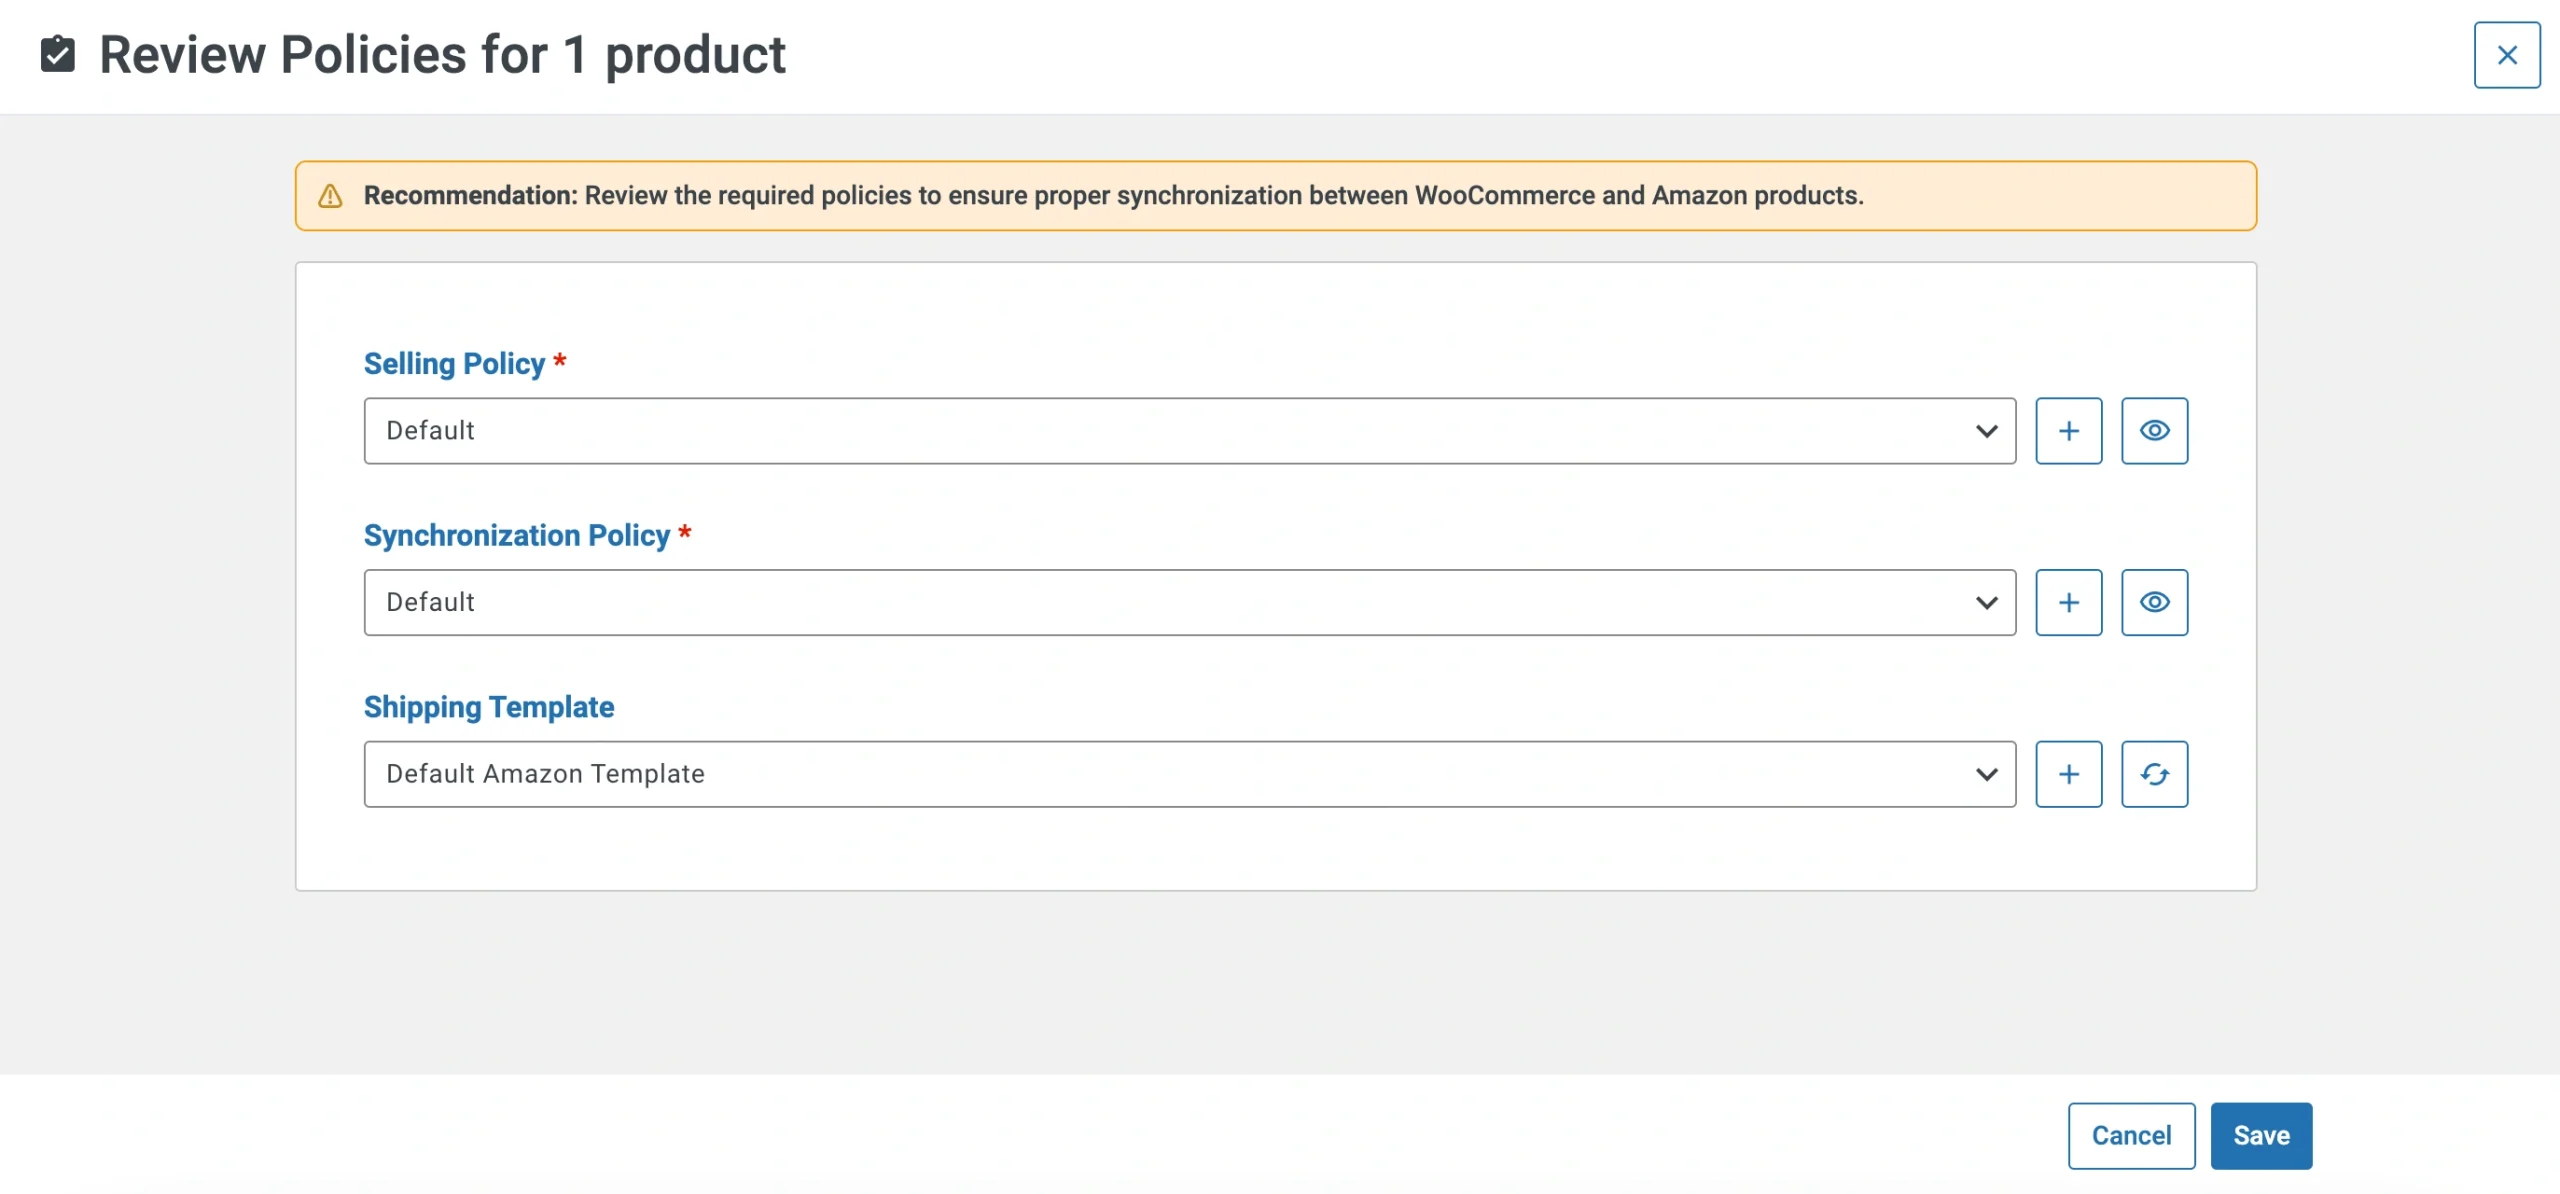
Once you are satisfied with the policy settings, click Save. This will enable inventory synchronization.
With synchronization enabled, M2E Multichannel Connect reflects updates to your products’ titles, prices, quantity, and other details everywhere you sell in real-time.
💡 For detailed instructions on enabling inventory sync, see here.
List WooCommerce products on Channels #
M2E Multichannel Connect allows you to create new listings on marketplaces based on your WooCommerce products. Navigate to the Listings tab, select your Channel account, and click List New Items in the top right corner of the page.
💡 Check out tutorials on how to create new Channel listings:
- eBay [user guide / video tutorial]
- Amazon [user guide / video tutorial]
- Walmart [user guide / video tutorial]
- TikTok Shop [user guide / video tutorial]
- Kaufland [user guide]
- Temu [user guide]
How-to guides #
Configure price settings for Channels #
M2E Multichannel Connect allows you to optimize product prices of your Channel items and define other pricing settings in Selling Policy.
You can edit the existing Selling Policy or create a new one under Listings > Open product card > Policies tab.

To change Selling Policy settings for several items at once, tick the boxes next to the needed items under the Listings tab and apply the Change Policy mass action.

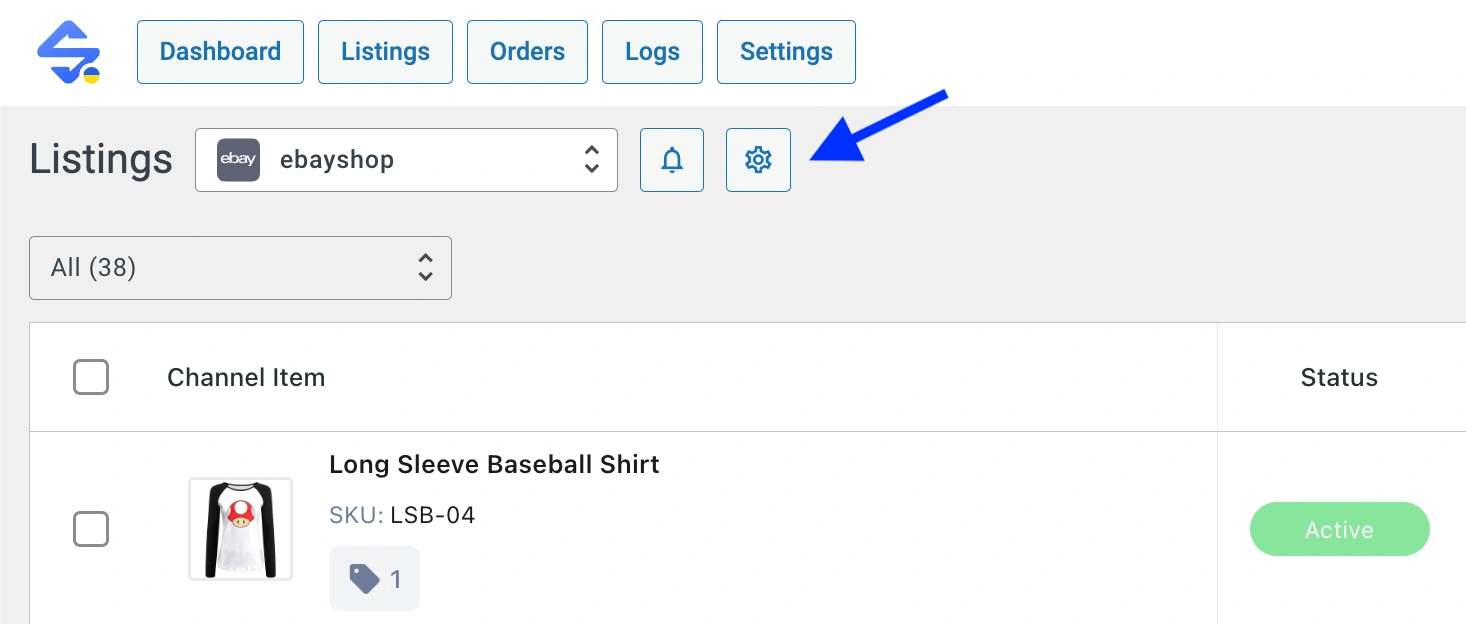
For eBay, you can also access your Selling Policy settings by clicking on the gear icon in the upper left corner of the eBay Listings page.
By default, M2E Multichannel Connect uses WooCommerce price information when listing or revising products on the Channel. But you can adjust the prices submitted to the Channel using the following pricing settings in your Selling Policy:
Define your price source #
By default, your WooCommerce product price is used as a source for your price values on Channels. Or you can set a WooCommerce attribute as a source for product price on the Channel instead.
For that, set the Source option to Attribute in the Price section and select the relevant WooCommerce attribute from the drop-down menu.

If you’ve selected a WooCommerce attribute, make sure that it contains an appropriate price value in the numeric format.
Adjust product prices on Channels #
Depending on your pricing model, you may need to set a custom price for your products on the Channel, which will differ from the price featured in WooCommerce. To adjust the prices individually for each marketplace, use the Price Modification option.
Click Add Price Modification in the Price section. Choose how you want to modify pricing – whether to increase or decrease the Channel item price compared to the corresponding WooCommerce price/attribute by the specified number of units or percent value. You can add multiple price modifications if necessary.

Enable Best Offer (for eBay) #
You can let your customers make price offers on your eBay listings using the Best Offer option. For that, navigate to the corresponding section in your Selling Policy and click Add Best Offer Modification.

There, you can set rules to auto-accept or auto-decline buyer’s offers based on your specified criteria:
- Accept Offers of at Least – the price at which (or greater than) an offer will be automatically accepted. Indicate the % of product price or select a relevant WooCommerce attribute.
- Decline Offers Less Than – the price at which (or less than) an offer will be automatically declined. Indicate the % of product price or select a relevant WooCommerce attribute.
If you’ve selected a WooCommerce attribute, make sure that it contains an appropriate price value in the numeric format.
⚠️ According to eBay requirements, there should be a difference of at least 2% between the Accept and Decline price values.
Round product prices #
Use the Rounding option to round your product prices on Channel to convenient numbers like $9.99 or $10.00. You can select an amount at which you want to round the Price:
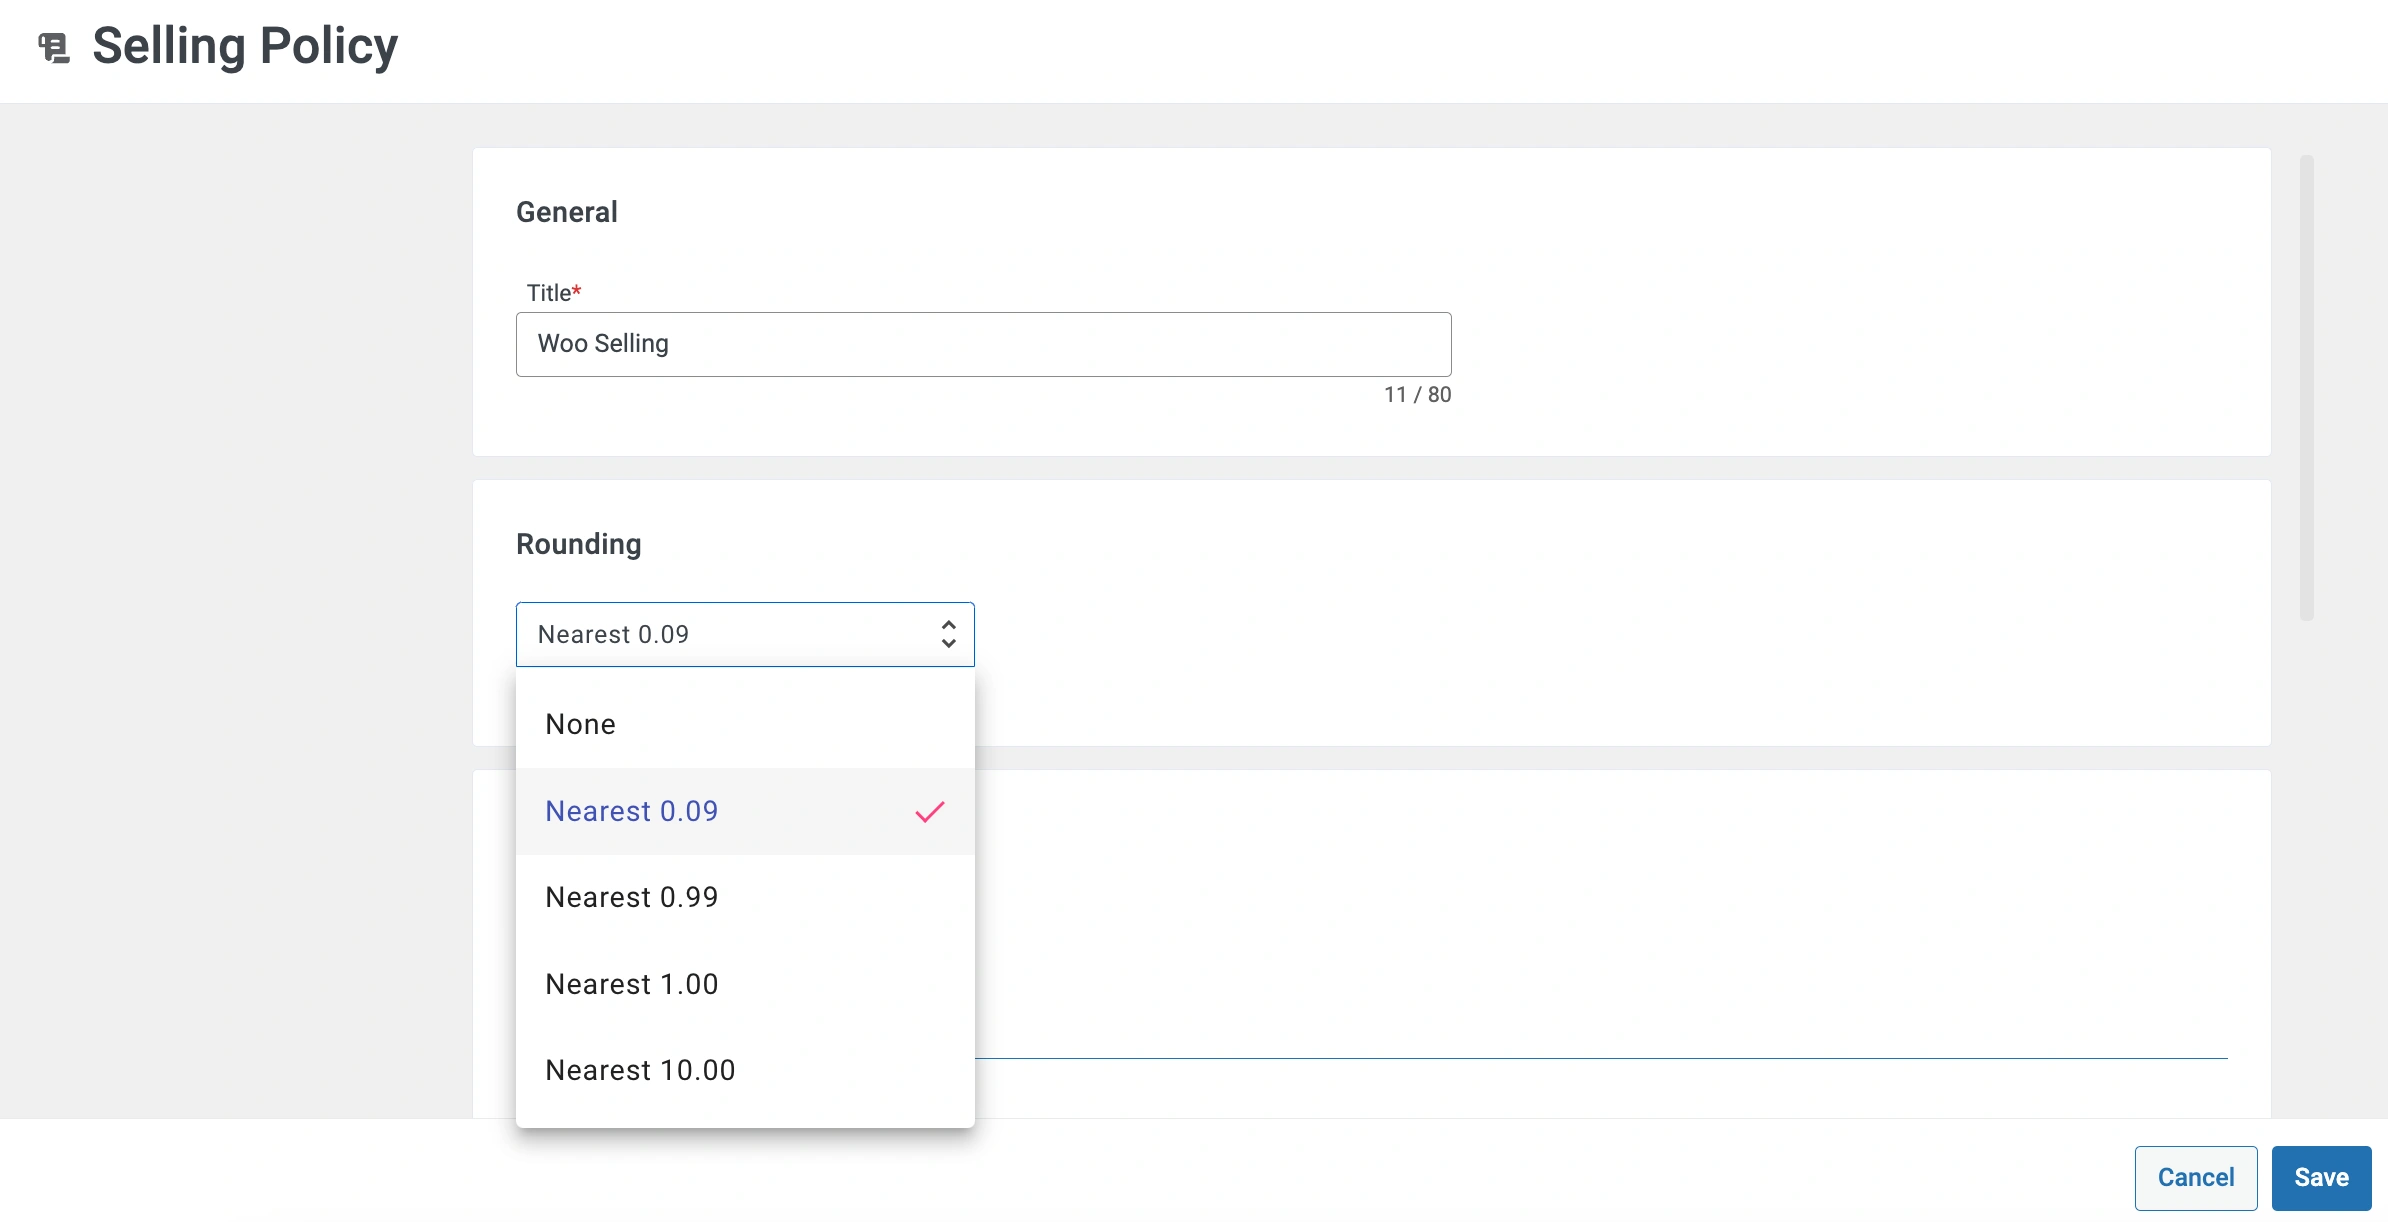
- Nearest 0.09 – for example, $5.10 rounds down to $5.09; $5.95 rounds up to $5.99.
- Nearest 0.99 – for example, $5.10 rounds down to $4.99; $5.95 rounds up to $5.99.
- Nearest 1.00 – for example, $5.10 rounds down to $5.00; 5.95 rounds up to $6.00.
- Nearest 10.00 – for example, $5.10 rounds up to $10.00; $14.99 rounds down to $10.00.
Once you’re done configuring price settings, save the changes. Keep in mind that the changes will be applied to all Channel items that use this Selling Policy.
Configure quantity settings for Channels #
M2E Multichannel Connect allows you to adjust the stock of your Channel items and define other quantity settings in Selling Policy.
You can edit the existing Selling Policy or create a new one under Listings > Open product card > Policies tab.

To change Selling Policy settings for several items at once, tick the boxes next to the needed items under the Listings tab and apply the Change Policy mass action.
For eBay, you can also access your Selling Policy settings by clicking on the gear icon in the upper left corner of the eBay Listings page.
By default, M2E Multichannel Connect uses WooCommerce quantity information when listing or revising products on the Channel. But you can adjust the product stock submitted to the Channel using the following quantity settings in your Selling Policy:
Set quantity for non-tracked products #
If your WooCommerce products have untracked or unspecified quantities, you can indicate the quantity value for corresponding Channel products. Find the Use value when quantity track is off option under the Quantity section in your Selling Policy and enter the relevant value in the dedicated field.

The plugin will submit this quantity value to the Channel when listing or revising your products.
Reserve your product quantity #
You have the option to reserve a specific quantity of your product from the total WooCommerce quantity, for example, to prevent overselling or conduct returns.
For that, click Add Quantity Modification in the Quantity section of your Selling Policy. Then, enter the quantity value you want to reserve in the Reserve field.

Let’s say you want to reserve 3 units. If the product quantity in WooCommerce is 20, the product will be submitted to the Channel with a quantity value of 17.
Adjust product quantities on Channels #
In some cases, you may need to set a custom quantity for your product on the Channel, which will differ from the quantity featured in WooCommerce. To adjust the quantity individually for each marketplace, use the Keep on Channel option.
Click Add Quantity Modification in the Quantity section of your Selling Policy. Then, enter the quantity value you want to be displayed on Channels. The actual WooCommerce quantity will be displayed if it drops below the threshold.

Once you’re done configuring quantity settings, save the changes. Keep in mind that the changes will be applied to all Channel items that use this Selling Policy.
Change settings for Channel items #
When setting up your M2E Multichannel Connect account, you’ve defined default Policies, which are settings necessary for listing and selling items on Channels.
At any time, you can edit your Policy settings with several clicks, create new Policies, and assign them to your Channel items.
Edit settings for individual items #
To adjust settings for a particular Channel item, navigate to the Listings tab and choose the needed account in the top left corner of the page. Then, open the product card and switch to the Policies tab.
Click on the Change button and adjust the Policy settings for your item in the pop-up window. Once done, save the changes.

Edit settings for multiple items #
To adjust settings for several Channel items in bulk, navigate to the Listings tab and choose the needed account in the top left corner of the page. Then, tick the boxes next to the needed items and apply the Change Policy mass action.
Click on the View/Edit button to adjust the Policy settings for your items in the pop-up window. Once done, save the changes.
For eBay, you can also manage and edit Policy settings by clicking on the gear icon in the upper left corner of the eBay Listings page.
An eBay Configuration pop-up window will appear where you can manage and edit all your Policies for eBay listings.

If you make changes to your Policy settings, keep in mind that they will be applied to all Channel items that use this Policy.
Once the changes are saved, the plugin will revise product information on Channels according to your Synchronization Policy settings.

Video Tutorials #
Take a moment to watch the following video guides to help you use the M2E Multichannel Connect plugin effectively:
- Integrate your WooCommerce store with eBay, Amazon & Walmart: Plugin Overview


