
Use this guide to get started with M2E Multichannel Connect and test the application without affecting your current setup.
The process is straightforward and doesn’t require technical knowledge.
Overview #
When migrating to M2E Cloud, take a gradual approach to get familiar with the new system. This way, you can keep your sales running smoothly while the migration is in progress.
- Start small: Begin the migration with a few existing items to test listing and order processing in the new environment. This helps you adapt to how the system works.
- List new items: At the same time, list a couple of new items. This takes you through the full listing process and shows you how M2E Cloud handles listings.
- Test order processing: Create a test order in your data source. Then check that the status and tracking number update on the marketplace for items with synchronization enabled.
ℹ️ The app interface is available in several languages. To change the language, go to Settings > General.
💡 Check out the video walkthrough of the M2E Multichannel Connect setup.
Step 1. Connect your Channel accounts. #
Install the M2E Multichannel Connect into your store admin. Once done, follow the on-screen prompts to connect your Channel accounts.
You can link Sandbox accounts or your actual Channel accounts to test the application using real product and order data.
ℹ️ You can safely link your Channels accounts to the application. Inventory and order synchronization will be under your control.
Step 2. Link products. #
Select either real inventory or sample products for testing; up to 10 items are recommended. This will help you test different scenarios under controlled conditions.
The app attempts to automatically link your store products to Channel listings using Product IDs or SKUs. If linked, a corresponding ID appears in the Store SKU column, so you can proceed to step 3.
If no automatic match is found, you can try manual linking. Go to the Listings tab and use the filters at the top of the grid to find the Not Linked products.

Click the Link button and search for the matching product in your store by title, SKU, or identifier. Once found, choose the Link option.

If you don’t have a matching product in your store, you can create one immediately. Click on the arrow next to the Link button and select the Create new store product and link option.

💡 Check out the full guide on linking products in M2E Multichannel Connect.
Step 3. Enable inventory synchronization. #
Now, you need to enable synchronization for the items you’ve previously linked. Inventory sync provides automatic product data updates and keeps the product data consistent between your store and Channel.
⚠️ To avoid duplications, please disable product synchronization in your current solution.
To enable synchronization for a single item, go to the Listings tab and click the toggle in the Inventory Sync column.

To enable sync for several Channel items at once, select them by ticking the boxes on the left side of the grid. The top menu will appear, where you need to click the Manage Sync > Enable Sync button.

Before activating the sync, the app will ask you to review and modify the default product settings to match your testing needs. Once done, save the settings.

If the inventory sync is enabled, you will see a relevant message.
💡 Check out the full guide on enabling inventory sync in M2E Multichannel Connect.
Step 4. Enable order synchronization. #
To let M2E Multichannel Connect import and manage orders from Channels, you need to enable order synchronization. Navigate to Settings > Orders > your Channel account and click the toggle next to the “Create Channel Orders in Store” option.

Now, you can test the order workflow. Place test orders to see how they are processed. Add tracking numbers to test orders and monitor how this information is communicated back to the Channel. Use the Orders tab to view order progress and detailed logs.
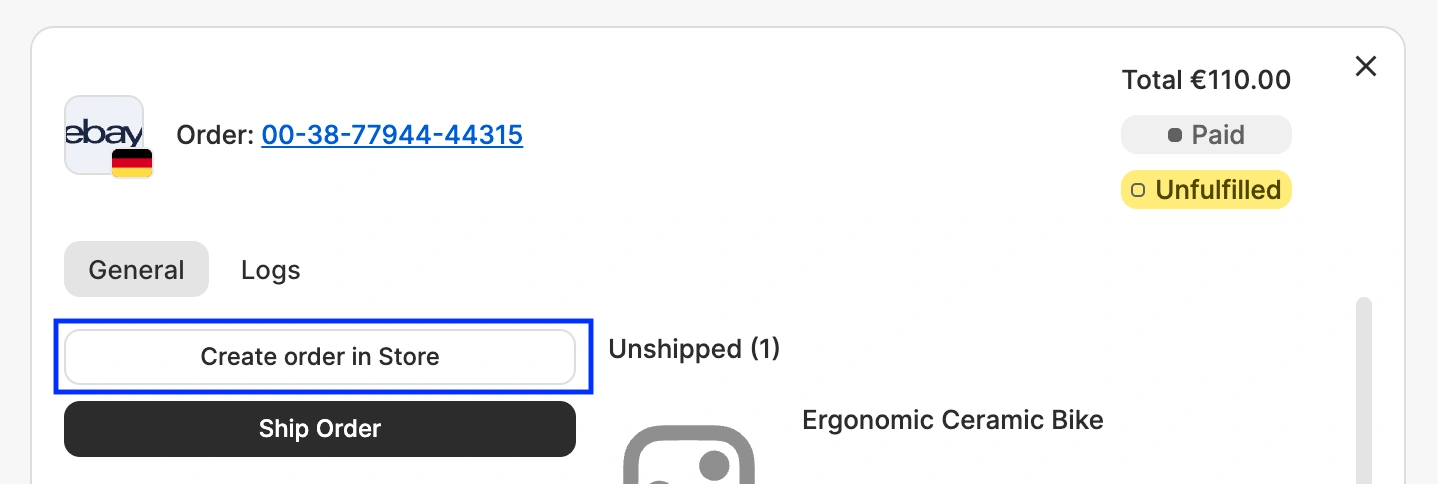
For testing, you can skip enabling order synchronization and manually create Channel orders in your store. Navigate to the Orders tab, open your test Channel order, and click the Create order in Store button. The corresponding order will promptly appear in your store.
Step 5. Try creating new listings. #
Go to the Listings tab and use the List on Channel button to try listing one or two of the products from your store on the connected Channels.

💡 Check out tutorials on how to create new Channel listings:
- eBay [user guide / video tutorial]
- Amazon [user guide / video tutorial]
- Walmart [user guide / video tutorial]
- TikTok Shop [user guide / video tutorial]
- Kaufland [user guide / video tutorial]
- Temu [user guide]
- Mirakl [user guide]
Migration checklist #
Complete the migration to M2E Cloud in the following order:
- Connect your channel accounts: Link all your sales channels to M2E Cloud.
- Select and link products: Choose a small set of products for testing and link them to their respective channel listings.
- Disable current sync for test products: Turn off synchronization for the test products in your previous solution, so the two systems don't send conflicting data.
- Enable inventory sync: Activate inventory synchronization for a selected group of products.
- Verify product data accuracy: Check that all product details, including prices and stock levels, are consistent across all connected channels.
- Activate order synchronization: Turn on order synchronization for the linked products and run an order through the full workflow.
- List new items: Publish new products and confirm that the listings are correctly created and displayed on the channels.
- Link all items: Once the tests pass, link the rest of your items to existing marketplace listings.
- Set up full synchronization: Enable synchronization for inventory, orders, and other relevant data once you're confident in the system's reliability.
- Switch off previous solution’s sync: Disable synchronization in your previous solution once inventory and orders sync correctly with M2E Cloud.
Need help? #
ℹ️ If you have questions or need additional guidance during your setup and migration, please contact our support team for help.


How to change category on eBay for Ecwid store?
Thank you for your question. It sounds like you’re asking about how your Ecwid categories are mapped to eBay when listing new products through M2E Multichannel Connect. When you list a new product on eBay via our app, the system automatically suggests an eBay category based on your Ecwid product category. You can either accept this suggested category or manually select a different one if it doesn’t fit your product.
If your question was about something else, feel free to reach out to our support team at support@m2ecloud.com — we’ll be happy to assist you further.